Creating a Gallery Wall That Doesn't Damage Walls
Learn the three best damage-free hanging methods and how to arrange frames without measuring for hours.
Why Damage-Free Matters
You're renting. You've got a blank wall that's begging for personality, but you're also terrified of losing your deposit. We get it. The good news? You don't have to choose between a beautiful space and keeping your landlord happy.
Gallery walls are having a moment, and there's a reason. They transform a boring stretch of plaster into something that actually says something about who you are. Plus, they're easier to do than you'd think — if you know which methods actually work.
The key is knowing your options. There's more than just sticky hooks these days, and some methods are genuinely better than others. We're talking about adhesive strips that actually hold, rails that don't leave marks, and wire systems that won't fail at 2 a.m. when your favourite print decides to take a dive.

The Three Methods That Actually Work
Each approach has its strengths. Pick the one that fits your wall type and your patience level.
1
Command Strips & Heavy-Duty Adhesive
Command strips are the workhorse of damage-free hanging. They're reliable, come in different weight ratings (5 lb, 16 lb, up to 20 lb for larger frames), and actually work on most painted walls. The trick? Clean the wall first with a magic eraser, let it dry completely, and follow the weight limits exactly. Don't cheat and put a 20 lb frame on a 5 lb strip.
Installation takes 30 seconds. Removal is painless — just pull the tab straight down. They don't leave residue if you do it right. Plus, they're about 60p per pair, so cost isn't an issue.
2
Picture Rails & Hooks
Picture rails are having a real comeback, and for good reason. You install a slim rail near the top of your wall (usually 25-30 cm from the ceiling), and then hang frames from hooks that slide along it. The wall damage? Minimal. You're just making two small holes to secure the rail itself.
The advantage is flexibility. Want to rearrange tomorrow? Just move the hooks. Want a different spacing? Slide them around. It's genuinely the most renter-friendly option if you're willing to invest in the rail itself (£15-40 depending on length and finish).
3
Tension Rod & Wire Systems
If you want zero permanent holes, this is your answer. Tension rods and wire systems use the space between floor and ceiling (or between existing fixtures) to hold frames without touching the walls themselves. Some systems use weighted bases, others use corner anchors.
They're perfect for awkward layouts and look surprisingly clean. The downside? They're slightly pricier (£40-100 for a decent system) and work best with lightweight frames. But if you're in a studio flat with weird wall configurations, they're brilliant.

Arranging Without the Maths Headache
Here's where most people get stuck. You've got your frames, you've got your wall, and suddenly you're doing geometry. Don't panic. There's actually a simple approach that works every time.
Start with a focal point — usually the centre of your wall or the space above a piece of furniture. Arrange your largest frame here. Everything else builds around it. Aim for 5-8 cm gaps between frames. It's tight enough to feel intentional, loose enough to not look cramped.
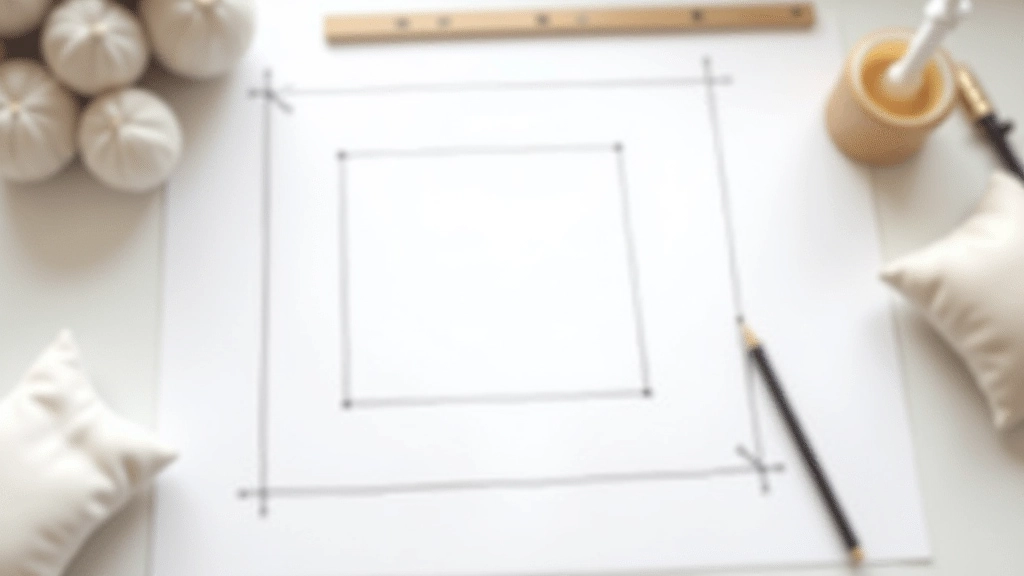
Pro tip: Use kraft paper to template each frame before you hang anything. Tape paper cutouts to the wall, step back, take a photo. Adjust until you're happy. Then use those paper templates as your hanging guide. Takes an extra 20 minutes but saves you from hammer-sized regrets.
Stick to an odd number of frames — 3, 5, 7, 9. Odd numbers feel more natural. Mix your frame sizes and colours, but keep them cohesive. Black frames with natural wood frames work. Black frames with bright gold? Maybe not so much. If you're unsure, stick with three variations maximum.
Quick Wins to Get It Right
Measure from Centre
Find the centre point of each frame and mark it on your wall. This single measurement method beats trying to level each frame individually.
Test Your Strips First
Stick one Command strip on a spare frame and let it hang for a week. If it holds, you've got your method. If it slips, upgrade to the heavier version.
Consider Your Wall Type
Textured walls are trickier. Strips don't grip as well. Picture rails are better. Smooth painted walls? Strips work beautifully.
Mix Media Types
Prints, photographs, textiles, small mirrors. Variation makes it interesting. Just keep the frames in a similar style family.
Ready to Make Your Walls Talk
Gallery walls don't require a degree in interior design. They just need a method, a bit of planning, and the confidence to start. Pick your hanging system based on your wall type and your patience level. Use the kraft paper template trick. Arrange odd numbers with consistent spacing. That's it.
The best part? If you don't like it in six months, you can take it down, patch the tiny holes, and start over. No landlord drama. No lost deposits. Just walls that actually reflect who you are.
Start small if you're nervous. One or two frames, positioned perfectly. Build from there. You'll be amazed at how much personality a few thoughtful pieces can add to a space.
Disclaimer
This article is provided for informational and educational purposes only. The techniques described are general guidance and may vary depending on your specific wall type, rental agreement, and local regulations. Always check your tenancy agreement before making any wall modifications. We recommend testing hanging systems on inconspicuous areas first and consulting with your landlord if you're unsure about any method. Results vary based on wall condition, frame weight, and installation technique. We're not responsible for any damage to walls or loss of security deposits resulting from following these methods.